Quick Start
1. Making Your First Project
Let’s start from the
simplest (and now existing) project. Suppose that you have to prepare a great
number of reports in W9 form. You have already found a sample PDF file with W9
form on the Internet and you have XML file exported from your database. Your
task is to prepare reports from these data.
Try to repeat
creating one of sample projects W9 step-by-step.
-
So, start the application. As soon as it has started a new project is created.
-
Prepare a new folder in “All Users\Documents\VisualXSL
Projects” for it. Call it “1stTry”. Copy “w9src.xml” and “w9_blank.pdf” files
from “All Users\Documents\VisualXSL Projects” to new directory.
-
Add data source (File -> Open Source XML), select
“w9src.xml” from a newly created folder. Mind that node “batch/W9” is set as
Pattern property by application in page properties after the last step. Save
your project as “1stTry.vxl”.
-
Click on the design layout. Then page properties will
be shown in the appropriate window. Select BackgroundPath property, click
(…) button and open “w9_blank.pdf” file. Application will show its rasterized
image on design layout.
See flash-movie
illustrating steps from 1 to 4
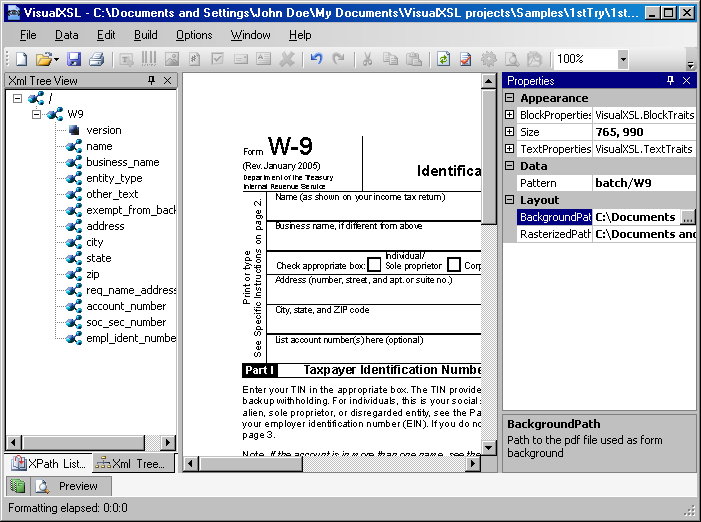
Fig.1.1
BackgroundPath property for a new project page
-
Find in XML tree “name” node, drag and drop it to the layout.
Place and resize it to fit template in background form.
-
Switch to its properties. Expand InnerText property,
then TextProperties. Change its font settings clicking the (…) button.
You can change formatting not only for one data field at a time but for all data
fields on the whole page (once specific formatting is not already set for data
field). As you are going to add data fields with the same formatting, change
page formatting properties (TextProperties->Font Arial; 10pt).
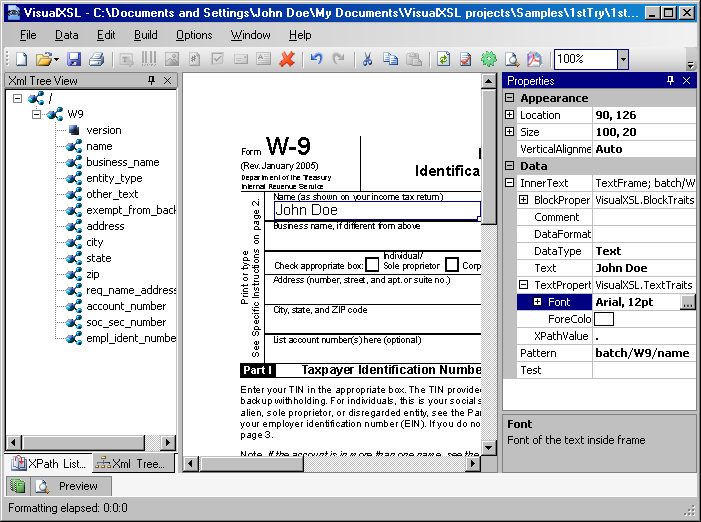
Fig.1.2 Text formatting properties of
the selected data field
-
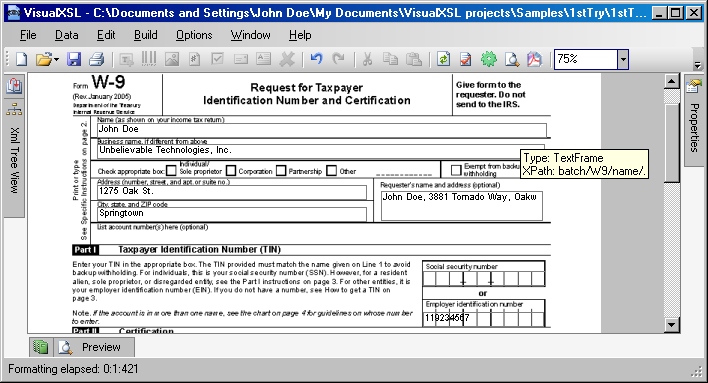
So the first steps are made. It is time to see what you will
get as a result. Click preview button in toolbar and switch to Log window. You
can monitor the formatting process by tracing messages from XEP formatter. In a
second you will have the preview of resulting document.
-
Drag and drop the rest of XML nodes to layout (except the
ones corresponded to checkboxes). Resize them to fit empty spaces on the
background. Do not bother with additional formatting so far, you will do it
later. Then your project should look like the one from the screenshot (Fig.1.2).
- But your project is still far from
being perfect. There must be marks done in empty squares (they should be
rendered under certain conditions), the address must be correctly formed from
city, state, and ZIP node values; the data field with SSN (or employes
indentification number) should be justified across the appropriate rectangle.
See flash-movie illustrating steps from 5
to 9
- First of all correct the data field
with city name. You should change the property Pattern to “batch/W9” and
InnerText->XPathValue to “concat(city,', ',state,' ',zip)” to do
it. So XSL code will be generated in template with attribute match=“batch/W9”
and also will render data getting by XPath expression “concat(city,', ',state,'
',zip)”.
See flash-movie
illustrating step 10
- Moreover you should make checkmarks in
appropriate boxes. For getting that, select the XML node “batch/W9” and choose
Data->Add CheckBox from the menu. Switch to the property Test of
the created field and type in the following: “entity_type
= 'individual'” (XPath expression to be used as the
condition to render the field). So the field will be rendered only if the
condition is true. Repeat this procedure for the rest of checkboxes, setting the
Test property correspondingly “entity_type =
'corporation'”, “entity_type
= 'partnership'” and “entity_type = 'other'”.
See flash-movie
illustrating step 11
- And the last step is correcting of
social id number placing. Select soc_sec_number
in the XML tree and drag it to the layout. Resize it to fit the grid on the
background.
- Choose BlockProperties
–>AlignLast
property and change its value to “Justify”, to set spaces between digits
properly. Make a preview of the project. Now you are supposed to have result
similar to sample W9 project one (except barcodes).
See flash-movie
illustrating steps from 12 to 13
Pic.1.3 Unfinished project (no checkmarks, bad address, etc)
2. Creating a New Project from the
Scratch
Now you should prepare XML source and PDF
background by yourself. It is not as difficult as it seems. To complete this
tutorial you must have Microsoft Office Professional Edition 2003 (or greater)
installed. You will use Microsoft Excel to prepare XML source file and Microsoft
Word to make an invitation letter form. You are supposed to prepare and mail
anniversary party invitations to all company managers from name of its CEO. All
employees’ information is stored in Excel spreadsheet (see Fig.2.1). The letter
should look like the one on the Fig. 2.1 and you should be able either to print
it and to e-mail it as an electronic document.

Fig.2.1 The invitation letter

Fig.2.2 Data in the Excel spreadsheet
First of all create XML
source file. You should have some XML schema to be able to map data to XML tags
and export it to XML file. The simplest way to do that is to prepare a little
XML file describing the common structure of your data.
Your XML file should look
like following one (you can omit some elements not necessary for your task).
Write down XML node corresponding to data record twice to make MS Excel
understand that this node can be replicated many times. Here it is:
<employees>
<record>
<EmployeeID>1</EmployeeID>
<LastName>Davolio</LastName>
<FirstName>Nancy</FirstName>
<Title>Sales
Representative</Title>
<TitleOfCourtesy>Ms.</TitleOfCourtesy>
<BirthDate>1968-12-08</BirthDate>
<HireDate>1992-05-01</HireDate>
<Address>507
- 20th Ave. E. Apt. 2A</Address>
<City>Seattle</City>
<Region>WA</Region>
<PostalCode>98122</PostalCode>
<Country>USA</Country>
<HomePhone>(206)
555-9857</HomePhone>
<Extension>5467</Extension>
</record>
<record>
<EmployeeID>2</EmployeeID>
<LastName>Davolio</LastName>
<FirstName>Nancy</FirstName>
<Title>Sales
Representative</Title>
<TitleOfCourtesy>Ms.</TitleOfCourtesy>
<BirthDate>1968-12-08</BirthDate>
<HireDate>1992-05-01</HireDate>
<Address>507
- 20th Ave. E. Apt. 2A</Address>
<City>Seattle</City>
<Region>WA</Region>
<PostalCode>98122</PostalCode>
<Country>USA</Country>
<HomePhone>(206)
555-9857</HomePhone>
<Extension>5467</Extension>
</record>
</employees>
Attach new XML map by
doing the following:
1)
Open XML source tab by selecting Data >> XML >> XML
Source.
2)
Then click on “XML maps…” button that will bring up
the window with XML map list.
3)
Add a new one by clicking “Add…” button and
selecting the prepared XML file as XML source.
4)
When a warning message that no XML schema is
referred to this file appears, just click “Ok” and Excel will create schema
automatically.

Fig. 2.3 Warning that Microsoft Excel will
create a schema based on selected XML file.
Now you have to map all XML elements to
spreadsheet data columns. After you have finished that you can export the
spreadsheet to XML.

Fig. 2.4 XML elements mapped to Microsoft
Excel spreadsheet data columns.
Save your spreadsheet as
XML file to your project folder.
It is time to prepare PDF
document that should be used as the background. Use Microsoft Word text
processor and create a document with space left for data to be changed. The
document may look like this one (see Fig.2.5). Save it as an XML (WordML) file.
